Coordinates
How Northstar's coordinate system works and how to convert coordinates to pixel positions.
Northstar sees a screenshot and decides where to act. Internally, it always thinks in a fixed 0–999 grid, regardless of the actual screen resolution. Coordinates come back to your code in this same 0–999 space; you convert them to pixels before clicking.
The 0–999 grid
Section titled “The 0–999 grid”Every coordinate Northstar outputs is a point on this grid, overlaid on the screen:
The model says “click at (500, 500)” meaning “click in the center”, whether the screen is 500px or 3840px wide.
Converting to pixel coordinates
Section titled “Converting to pixel coordinates”Northstar always returns coordinates in a 0–999 space. Your code converts them to pixel coordinates before clicking:
pixel_x = int(model_x / 1000 * display_width)pixel_y = int(model_y / 1000 * display_height)The model outputs (500, 500). Here’s where that maps to at three different viewport sizes:
Same model output, same logical position (center of screen), different pixel values. Apply the formula above, then pass the pixel coordinates to computer.click().
Which APIs return raw coordinates?
Section titled “Which APIs return raw coordinates?”All of them. Coordinates always come back in the 0–999 model space, so you always denormalize in your code.
| API | What you receive | What to do |
|---|---|---|
Responses API (with computer_use tool) | Raw 0–999 model coordinates | Denormalize to pixels before calling click() |
| Tasks | Handled internally | You don’t interact with coordinates |
| Chat Completions | Raw 0–999 model output | Denormalize to pixels before calling click() |
| Computers API (direct control) | N/A; you provide the coordinates | Pass pixel coordinates directly |
Responses API
Section titled “Responses API”When you get a computer_call, denormalize the coordinates before clicking:
DISPLAY_WIDTH = 1280DISPLAY_HEIGHT = 720
response = client.responses.create(    model="tzafon.northstar-cua-fast-1.6",    input=[{        "role": "user",        "content": [            {"type": "input_text", "text": "Click the search button"},            {"type": "input_image", "image_url": screenshot_url, "detail": "auto"},        ],    }],    tools=[{        "type": "computer_use",        "display_width": DISPLAY_WIDTH,        "display_height": DISPLAY_HEIGHT,        "environment": "desktop",    }],)
for item in response.output:    if item.type == "computer_call":        # Denormalize from 0–999 model space to pixel coordinates        x = int(item.action.x / 1000 * DISPLAY_WIDTH)        y = int(item.action.y / 1000 * DISPLAY_HEIGHT)        computer.click(x, y)
const DISPLAY_WIDTH = 1280;const DISPLAY_HEIGHT = 720;
const response = await client.responses.create({ model: "tzafon.northstar-cua-fast-1.6", input: [{ role: "user", content: [ { type: "input_text", text: "Click the search button" }, { type: "input_image", image_url: screenshotUrl, detail: "auto" }, ], }], tools: [{ type: "computer_use", display_width: DISPLAY_WIDTH, display_height: DISPLAY_HEIGHT, environment: "desktop", }],});
for (const item of response.output ?? []) { if (item.type === "computer_call") { // Denormalize from 0–999 model space to pixel coordinates const x = Math.floor(item.action!.x! / 1000 * DISPLAY_WIDTH); const y = Math.floor(item.action!.y! / 1000 * DISPLAY_HEIGHT); await client.computers.click(id, { x, y }); }}Chat Completions
Section titled “Chat Completions”The Chat Completions API does not scale coordinates; you receive raw model output and handle the conversion yourself. You need two things: a system prompt template and a scaling function.
System prompt template
Section titled “System prompt template”Add this to your system prompt, replacing the viewport dimensions with your own:
You are controlling a computer through screenshots and actions.
Screen information:- Viewport size: {viewport_width}x{viewport_height} pixels.- Coordinates range from (0,0) at the top-left to (999,999) at the bottom-right.- All coordinate values must be integers between 0 and 999 inclusive.
When clicking or interacting with elements:- Look at the screenshot to find the element's position.- Return coordinates in the 0-999 range. Your code will convert them to pixel coordinates.- Click elements in their CENTER, not on edges.
Scaling code
Section titled “Scaling code”Convert the model’s 0–999 coordinates back to pixel coordinates:
def scale_coordinates(    model_x: int, model_y: int,    viewport_width: int, viewport_height: int,) -> tuple[int, int]:    """Convert model coordinates (0-999) to actual pixel coordinates."""    x = int(model_x / 1000 * viewport_width)    y = int(model_y / 1000 * viewport_height)    return x, y
# Example: model says click (500, 500) on a 1280x720 viewportx, y = scale_coordinates(500, 500, 1280, 720)  # → (640, 360)
function scaleCoordinates( modelX: number, modelY: number, viewportWidth: number, viewportHeight: number,): [number, number] { /** Convert model coordinates (0-999) to actual pixel coordinates. */ const x = Math.floor(modelX / 1000 * viewportWidth); const y = Math.floor(modelY / 1000 * viewportHeight); return [x, y];}
// Example: model says click (500, 500) on a 1280x720 viewportconst [x, y] = scaleCoordinates(500, 500, 1280, 720); // → [640, 360]Full example
Section titled “Full example”Putting it together with the OpenAI SDK:
from openai import OpenAIimport json
client = OpenAI(    base_url="https://api.tzafon.ai/v1",    api_key="sk_your_api_key_here",)
VIEWPORT_WIDTH = 1280VIEWPORT_HEIGHT = 720
SYSTEM_PROMPT = f"""\You are controlling a computer through screenshots and actions.
Screen information:- Viewport size: {VIEWPORT_WIDTH}x{VIEWPORT_HEIGHT} pixels.- Coordinates range from (0,0) at the top-left to (999,999) at the bottom-right.- All coordinate values must be integers between 0 and 999 inclusive.
When clicking or interacting with elements:- Look at the screenshot to find the element's position.- Return coordinates in the 0-999 range. Your code will convert them to pixel coordinates.- Click elements in their CENTER, not on edges."""
result = client.chat.completions.create(    model="tzafon.northstar-cua-fast-1.6",    messages=[        {"role": "system", "content": SYSTEM_PROMPT},        {            "role": "user",            "content": [                {"type": "text", "text": "Click the search button"},                {"type": "image_url", "image_url": {"url": screenshot_url}},            ],        },    ],    tools=[        {            "type": "function",            "function": {                "name": "click",                "description": "Click at screen coordinates (0-999 range).",                "parameters": {                    "type": "object",                    "properties": {                        "x": {"type": "integer", "description": "X position (0=left edge, 999=right edge)"},                        "y": {"type": "integer", "description": "Y position (0=top edge, 999=bottom edge)"},                    },                    "required": ["x", "y"],                },            },        },    ],)
for choice in result.choices:    for tool_call in choice.message.tool_calls or []:        args = json.loads(tool_call.function.arguments)        pixel_x, pixel_y = scale_coordinates(            args["x"], args["y"], VIEWPORT_WIDTH, VIEWPORT_HEIGHT,        )        print(f"Click at pixel ({pixel_x}, {pixel_y})")
import OpenAI from "openai";
const client = new OpenAI({ baseURL: "https://api.tzafon.ai/v1", apiKey: "sk_your_api_key_here",});
const VIEWPORT_WIDTH = 1280;const VIEWPORT_HEIGHT = 720;
const SYSTEM_PROMPT = `You are controlling a computer through screenshots and actions.
Screen information:- Viewport size: ${VIEWPORT_WIDTH}x${VIEWPORT_HEIGHT} pixels.- Coordinates range from (0,0) at the top-left to (999,999) at the bottom-right.- All coordinate values must be integers between 0 and 999 inclusive.
When clicking or interacting with elements:- Look at the screenshot to find the element's position.- Return coordinates in the 0-999 range. Your code will convert them to pixel coordinates.- Click elements in their CENTER, not on edges.`;
const result = await client.chat.completions.create({ model: "tzafon.northstar-cua-fast-1.6", messages: [ { role: "system", content: SYSTEM_PROMPT }, { role: "user", content: [ { type: "text", text: "Click the search button" }, { type: "image_url", image_url: { url: screenshotUrl } }, ], }, ], tools: [ { type: "function", function: { name: "click", description: "Click at screen coordinates (0-999 range).", parameters: { type: "object", properties: { x: { type: "integer", description: "X position (0=left edge, 999=right edge)" }, y: { type: "integer", description: "Y position (0=top edge, 999=bottom edge)" }, }, required: ["x", "y"], }, }, }, ],});
for (const choice of result.choices) { for (const toolCall of choice.message.tool_calls ?? []) { const args = JSON.parse(toolCall.function.arguments); const [pixelX, pixelY] = scaleCoordinates( args.x, args.y, VIEWPORT_WIDTH, VIEWPORT_HEIGHT, ); console.log(`Click at pixel (${pixelX}, ${pixelY})`); }}Worked example
Section titled “Worked example”Here’s coordinate denormalization in action. We ask Northstar to click the search bar on a Wikipedia page. The model responds with (379, 43) in the 0–999 grid, which denormalizes to pixel (485, 30) on a 1280×720 viewport:
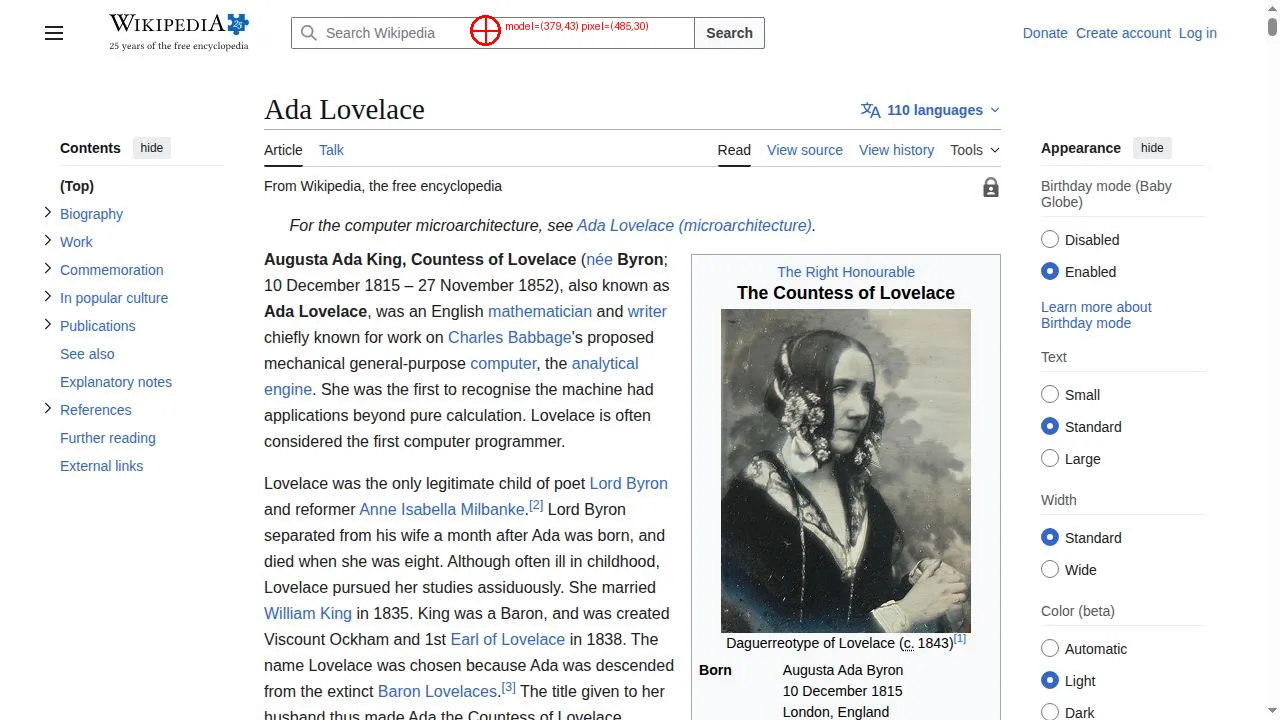
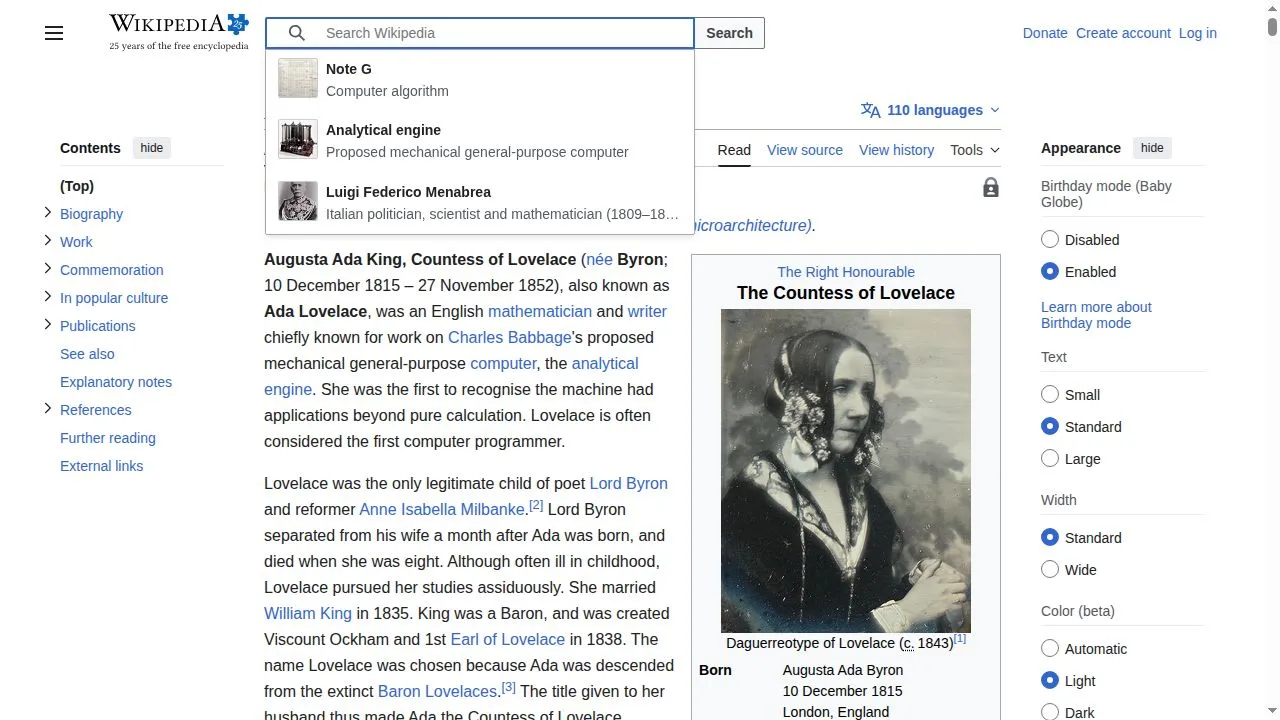
After clicking at the scaled pixel coordinates, the search bar is focused:
Full source code for this example
import ioimport urllib.requestfrom PIL import Image, ImageDrawfrom tzafon import Lightcone
DISPLAY_WIDTH = 1280DISPLAY_HEIGHT = 720
client = Lightcone()

def denormalize(model_x, model_y, width, height):    """Convert 0–999 model coordinates to pixel coordinates."""    return int(model_x / 1000 * width), int(model_y / 1000 * height)

def annotate_screenshot(image_bytes, pixel_x, pixel_y, model_x, model_y, output_path):    """Draw a red crosshair + label on the screenshot to visualize the click."""    img = Image.open(io.BytesIO(image_bytes)).convert("RGB")    draw = ImageDraw.Draw(img)    r = 15    draw.ellipse((pixel_x - r, pixel_y - r, pixel_x + r, pixel_y + r), outline="red", width=3)    draw.line((pixel_x - r, pixel_y, pixel_x + r, pixel_y), fill="red", width=2)    draw.line((pixel_x, pixel_y - r, pixel_x, pixel_y + r), fill="red", width=2)    label = f"model=({model_x},{model_y}) pixel=({pixel_x},{pixel_y})"    draw.text((pixel_x + r + 5, pixel_y - 10), label, fill="red")    img.save(output_path)

with client.computer.create(kind="browser") as computer:    computer.navigate("https://en.wikipedia.org/wiki/Ada_Lovelace")    computer.wait(3)
    result = computer.screenshot()    screenshot_url = computer.get_screenshot_url(result)
    with urllib.request.urlopen(screenshot_url) as resp:        screenshot_bytes = resp.read()
    # Ask Northstar where to click; coordinates come back in 0–999 space.    response = client.responses.create(        model="tzafon.northstar-cua-fast-1.6",        tools=[{            "type": "computer_use",            "display_width": DISPLAY_WIDTH,            "display_height": DISPLAY_HEIGHT,            "environment": "browser",        }],        input=[{            "role": "user",            "content": [                {"type": "input_text", "text": "Click the search bar."},                {"type": "input_image", "image_url": screenshot_url, "detail": "auto"},            ],        }],    )
    computer_call = next(        (item for item in response.output if item.type == "computer_call"), None    )    model_x, model_y = computer_call.action.x, computer_call.action.y
    # Denormalize to pixel coordinates before clicking.    pixel_x, pixel_y = denormalize(model_x, model_y, DISPLAY_WIDTH, DISPLAY_HEIGHT)    print(f"Model: ({model_x}, {model_y}) → Pixel: ({pixel_x}, {pixel_y})")
    annotate_screenshot(screenshot_bytes, pixel_x, pixel_y, model_x, model_y, "click_debug.png")
    computer.click(pixel_x, pixel_y)    computer.wait(2)
Run it yourself: coordinate_scaling.py
Direct computer control
Section titled “Direct computer control”When using the Computers API directly (no model), coordinates are raw pixel positions; you decide where to click:
# You provide pixel coordinates directlycomputer.click(640, 360) # center of a 1280x720 screencomputer.scroll(0, 300, 640, 400) # scroll down at positionawait client.computers.click(id, { x: 640, y: 360 });await client.computers.scroll(id, { dx: 0, dy: 300, x: 640, y: 400 });No scaling is involved; what you send is what happens.
See also
Section titled “See also”- Responses API: build a computer-use loop with coordinate denormalization
- Computer-use loop: full implementation guide with action dispatch
- Computers: direct control with pixel coordinates
- Chat Completions: text generation (no coordinate scaling)